Remote Setup

Using Insteon+ When You are Away from Home


When you are away from home, Insteon+ and Insteon Hub require an Apple TV (3rd generation or later) for remote access. Without a properly configured Apple TV, all of your devices will appear in Insteon+ but their function will be disabled.


Configure Remote Access

Step 1

On your iPhone, iPad or iPod touch, navigate to Settings > iCloud. The iCloud account listed is the account Insteon+ is using for your HomeKit configuration.

Step 2

On your Apple TV, navigate to Settings > iCloud. Ensure that you are signed in using the same iCloud account as your iPhone, iPad or iPod touch.


Basic Troubleshooting

  • If remote access does not work, sign out of your iCloud account on your Apple TV and then sign back in.
  • Ensure that your Insteon Hub and Apple TV are connected to the same network. If you have multiple routers or a complex networking setup, use the steps in this article to identify where to connect your devices.
  • Remote access only works with Apple TV (3rd generation or later). Applicable model numbers are A1427 and A1469. If you are unsure about the model of your Apple TV, visit apple.com for support.


2-Wire (AT&T/SBC) Router - Port Forwarding Guide

Note: 2-Wire routers are usually distributed by ATT/SBC in North America

Step 1: Open your web browser and enter router’s IP address (192.168.1.254 by default) in the address bar. Enter username and then password to login.

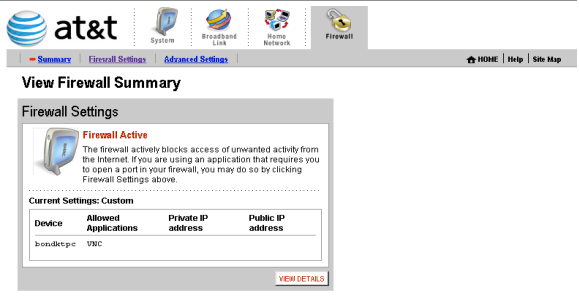
Step 2: Find and click on the Firewall tab on the top right.

Step 3: Find and click on the Firewall tab on the top right. Once the page is loaded, click on Add a new user-defined application.


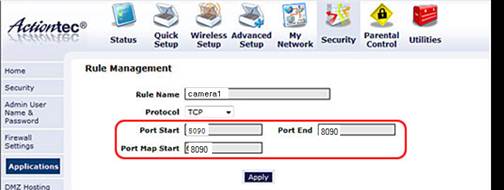
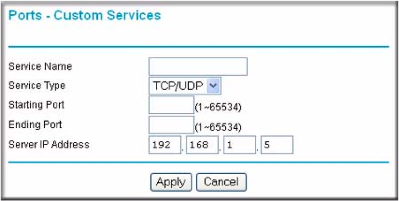
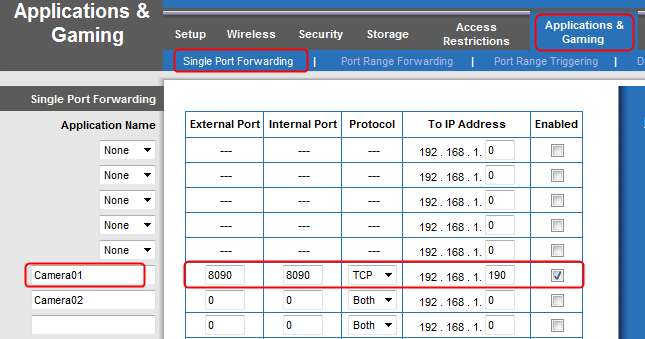
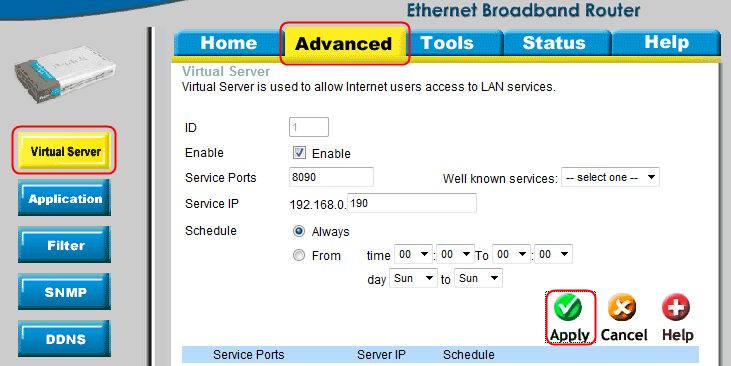
Step 4: For ‘Application Name’ give this entry a name e.g. INSTEON Camera
For ‘Protocol’ Choose ‘TCP’
For ‘Port (or Range)’ in ‘From’ & ‘To’ enter the ports to be forwarded.
Example: 8090 to 8090
For ‘Protocol Timeout (seconds)’ & ‘Map to Host Port’ & ‘Application Type’ you can leave these all at their default values.
Click ‘Add Definition’
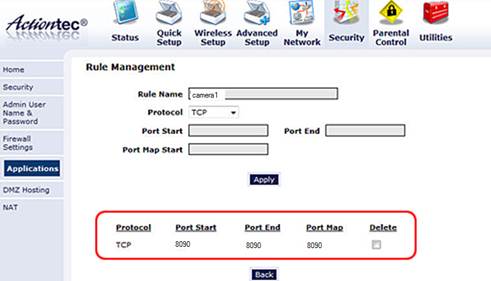
Repeat this step for all ports.
Once you have entered all the ports for this entry click ‘Back’

Step 5: For ‘Select a computer’ choose the INSTEON Camera’sIP address to forward the ports to.
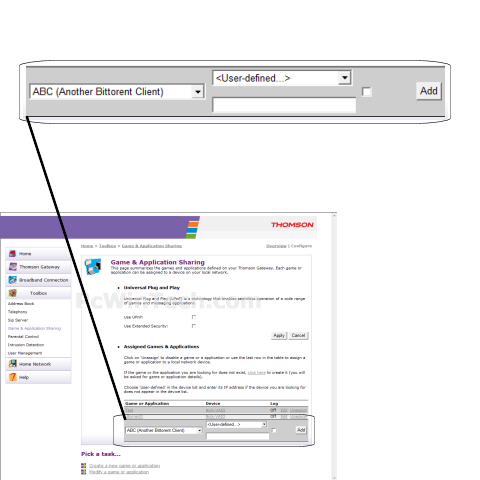
Choose ‘Allow individual applications’
Choose ‘User-defined’ from the drop down box
In the list on the left choose the entry you created “INSTEON Camera” and then click ‘Add’
Repeat this step for each entry you need to add.
Once you are all done click ‘Done’


Step 6: Once you’ve done that, INSTEON Camera should appear in the Hosted Applications
Click the Done button at the bottom right corner of the screen, and you should see the following screen:

Step 7: To view the camera over the internet enter you router external IP address which can be found by typing www.whatismyipaddress.com into your browser.

Enter your IP address (eg. 24.76.212.746): port for the camera (e.g. port 8090).
24.76.212.746:8090 is what should be typed into you browser.

You can check port is forwarded successful or not on
http://www.yougetsignal.com/tools/open-ports/


Verizon/Actiontec Router/Modem - Port Forwarding Guide

Actiontec GT704WG & GT704WGB gateways

Step 1: Open your web browser and enter router’s IP address (192.168.0.1 by default) in the address bar. Enter username (“admin” by default) and then password (“password” by default).

Step 2: Navigate to Security > Applications. Select the camera on your network where you want to use port forwarding in the PC Name field. Select User in the Category list and click New.

Step 3: Enter a name for your port forwarding rule in the Rule Name field. 
Select TCP in protocol and enter camera’s port number in port start, port end and port map start. Click Apply to save your rule settings.

Click Back to return to the Applications screen.

Step 4: Select the name of the rule you just created in the Available Rules box and click Add to use this port forwarding rule on camera. Click Apply.

You can check port is forwarded successful or not on
http://www.yougetsignal.com/tools/open-ports/


Thomson TG585 - Router/Modem Port Forwarding Guide

Note: This router/modem forwards based on computer name and not IP address. So there is no need to set a static IP.

Step 1: Open your web browser and enter router’s IP address (192.168.0.1 by default) in the address bar. Enter username ("admin" by default) and then password (blank by default)

Step 2: Navigate to Toolbox Game & ApplicationSharing. Once the page is done loading click on "Create a new game or application".

Step 3: For Name, give the new rule a name.
Choose "Manual Entry of Port Maps and then click "Next".

Step 4: For 'Protocol' Choose 'TCP'. For 'Port Range' enter camera’s port. Example: 2100 to 2100.  Click 'Add'.

Step 5: In the "Game or Application" list, choose the name of the new rule you created.
For "Device" you can either choose the computer name to forward to, or choose "User-Defined" to manually enter a IP address.
If you choose "User-Defined" a new text box will show up, enter the local IP to forward to here. 
Once you are all done click 'Add'.
If camera is "User-Defined", set a static IP address for camera first.

You can check port is forwarded successful or not on
http://www.yougetsignal.com/tools/open-ports


Netgear Router - Port Forwarding Guide

Step 1: Open your web browser and enter router’s IP address (192.168.0.1 by default) in the address bar. Enter username ("admin" by default) and then password (blank by default)

Step 2: Navigate to Port Forwarding/Port Triggering and select Port ForwardingSelect HTTP from the Service Name drop-down listClick Add Service button.


In the Service Name, type a name, like “camera”
In the Service Type, select TCP/UDP.
In the Starting Port, enter camera’s port number. Eg:8090
In the Ending Port, enter camera’s port number. Eg:8090
In the Server IP Address, enter camera’s IP address. Eg:192.168.1.5
Click Apply. You may need to restart the router for the changes to take effect.


You can check port is forwarded successful or not on
http://www.yougetsignal.com/tools/open-ports/


Linksys/Cisco Router - Port Forwarding Guide

Step 1: Open your web browser and enter router’s IP address (192.168.0.1 by default) in the address bar. Enter username ("admin" by default) and then password (blank by default)

Step 2: Click Applications & Gaming > Single Port Forwarding tab.
You enter a name what you like for the port forwarding. (Eg: Camera01)
Enter camera’s port number in External Port and Internal Port, select TCP for Protocol. (Eg: 8090)
Enter camera’s IP address and check Enable box. (Eg: 192.168.1.190)
After completing all the necessary entries, go to the bottom and click Save Settings.


You can check port is forwarded successful or not on
http://www.yougetsignal.com/tools/open-ports/


D-Link Router - Port Forwarding Guide

Step 1: Open your web browser and enter router’s IP address (192.168.0.1 by default) in the address bar. Enter username ("admin" by default) and then password (blank by default).

Step 2: Navigate to Advanced > Virtual Server
Enter the following information:
Check the box next to Enable.
Enter camera’s port in Service Ports. (Eg: 8090) 
Enter camera’s IP address in Service IP. (Eg: 192.168.0.190) 
Click Always in schedule.
Click Apply and then click Restart to save your changes.


You can check port is forwarded successful or not on
http://www.yougetsignal.com/tools/open-ports/


Belkin Router - Port Forwarding Guide

Step 1: Open your web browser and enter router’s IP address (192.168.0.1 by default) in the address bar. Enter username your router password (the default password is blank).

Step 2: Navigate to Firewall > Virtual Servers


Step 3: Check Enable
In the Description column enter a description of your network device (e.g. INSTEON Camera 1)
In “Inbound port” enter camera’s port number.
Next choose the “Type” you want to use. (For INSTEON cameras we will use TCP or Both)
Enter the Camera’s IP address in “Private IP Address”
In “Private port” enter camera’s port number.
Repeat step 5 for any more ports you want to forward.
Click on “Apply Changes”

You can check port is forwarded successful or not on
http://www.yougetsignal.com/tools/open-ports/


Port Forwarding Guides

The port forwarding set up is reliant upon the specific brand and model number of the router being used. The Insteon Hub (2012) and Insteon WiFi Cameras require forwarding for access to your network device from outside of your home network. The new Insteon Hub (2014) does not require port forwarding. Regardless of the router being used, the process of port forwarding is similar. Below is a list of port forwarding guides for popular routers:

Please follow the link below if your router is not listed.

Port Forwarding Guides