Port Forwarding

Configure Port Forwarding for Insteon Wi-Fi Cameras using a Buffalo Router

Follow the steps in this article to configure your Insteon Wi-Fi Camera for remote access. If the steps in this article do not match your specific router, consult your router's documentation.


Step 1

On your computer, open a browser and enter your router's IP address in the address bar. This address may be called Router IP Address or Default Gateway IP Address. If you do not know this information, follow the steps in this article to identify your router's IP address.


Step 2

You may see a log-in screen. Enter your router's user name and password. If you have never changed the password, try using the following:

  • User name: "root"

  • Password: Blank

Click OK to log in.


Step 3

Click the Add button located on the right side of the page.


Step 4

In the page that appears, enter the following information. The Local IP Address is the IP address of your Insteon Wi-Fi Camera.

  • TCP: 25106 (This should match the port given to your camera during camera setup)

  • UDP: 25106 (This should match the port given to your camera during setup)

  • LAN IP Address: Enter your Camera's IP Address

When ready, press Apply at the bottom of the page to save your changes.


Step 4

Test your connection by turning off Wi-Fi on your smartphone or tablet and attempt to control your WI-Fi Camera. If you can control your camera when on a cellular connection, then everything has been successfully configured.

Configure Port Forwarding for Insteon Wi-Fi Cameras using an Asus Router

Follow the steps in this article to configure your Insteon Wi-Fi Camera for remote access. If the steps in this article do not match your specific router, consult your router's documentation.


Step 1

On your computer, open a browser and enter your router's IP address in the address bar. This address may be called Router IP Address or Default Gateway IP Address. If you do not know this information, follow the steps in this article to identify your router's IP address.


Step 2

You may see a log-in screen. Enter your router's user name and password. If you have never changed the password, try using the following:

  • User name: "admin"
  • Password: "admin"

Click OK to log in.


Step 3

On the left sidebar, click NAT Setting.


Step 4

Click Virtual Server which has appeared beneath NAT Setting.


Step 5

In the page that appears, enter the following information. The Local IP Address is the IP address of your Insteon Wi-Fi Camera.

  • Enable Virtual Server: Yes
  • Well-Known Applications: User Defined
  • Port Range: 25106 (This should match the port given to your camera during camera setup)
  • Local IP: Enter your Camera's IP Address
  • Local Port Range 25106 (This should match the port given to your camera during setup)
  • Protocol: Both
  • Description: Your Camera's Name

When ready, press Finish at the bottom of the page to save your changes.


Step 6

Test your connection by turning off Wi-Fi on your smartphone or tablet and attempt to control your WI-Fi Camera. If you can control your camera when on a cellular connection, then everything has been successfully configured.


Configure Port Forwarding on Apple Routers

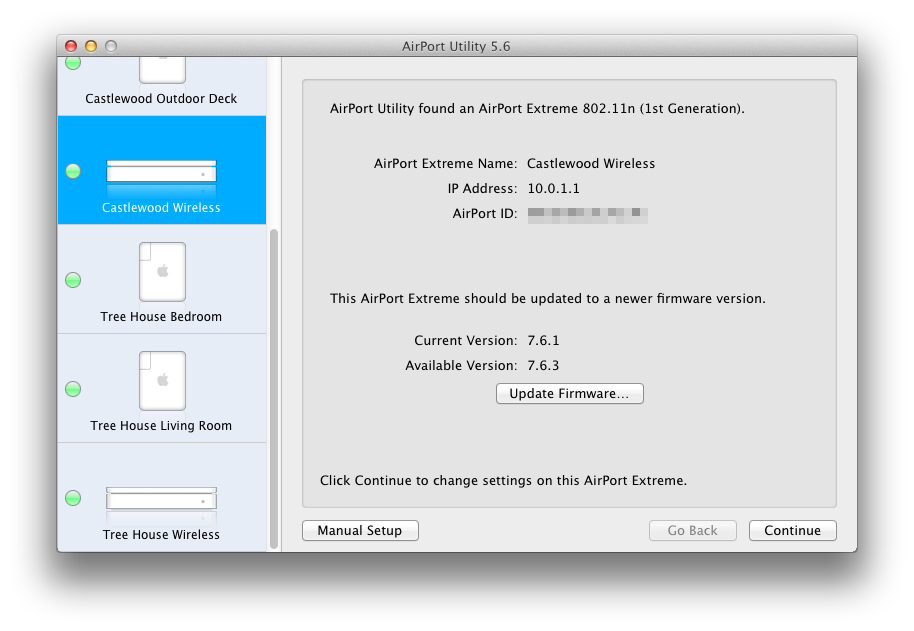
Apple Routers use a tool called AirPort Utility for router configuration.

  1. Launch AirPort Utility from the Utilities folder from within Applications on your Mac. If you are on a PC and using an Apple router, be sure that AirPort Utility has been downloaded and installed from www.apple.com.
  2. There are two different versions of AirPort Utility.
 
airport-utility-6.png
 

AirPort Utility (5.x)

  1. Click on your AirPort Express or AirPort Extreme from the left sidebar.
  2. At the top of the window, click the Internet button.
  3. lick the DHCP button near the top of the window.
  4. Click the small “+” button beneath the DHCP Reservation section.
  5. Enter the following information on the DHCP Reservation Setup Assistant panel.
    • Description: Insteon Wi-Fi Camera
      If you have more than one Wi-Fi camera, use a name that is unique and descriptive of it's location in your home.
    • Reserve Address: MAC Address
  6. When finished, click Continue.
  7. Enter the following information on the next page of the DHCP Reservation Setup Assistant panel. You will need to pick an IP Address that is not already in use. We suggest something like 10.0.1.222. Make note of this address as you will need it later. You can find your Wi-Fi camera's MAC Address on the underside of the camera.
    • If your camera will be connected with an ethernet cable, enter the MAC Address from the larger label.
    • If your camera will be connected with Wi-Fi, enter the MAC Address from the smaller label. This label may also state "Wi-Fi MAC."
      • MAC Address: 00:AA:00:AA:00:AA
      • IPv4 Address: 10.0.1.222
    • When finished, click Done.
  8. Click the NAT button at the top of the window.
  9. Click the Configure Port Mappings button.
  10. Click the small “+” button beneath the Port Mappings section.
  11. Fill out the fields for your Wi-Fi Camera. The Public and Private TCP Ports should match the port displayed by your Camera. Leave the Service menu and UDP Ports blank. The Private IP Address is the one that you wrote down previously. When finished, click Continue.
  12. Enter the same description as that used in Step 5 and click Done.
  13. At the bottom of the configuration panel, click the Update button. Your router will restart. You should also restart your Wi-Fi Camera by disconnecting and reconnecting it to power.

To test your connection, turn off Wi-Fi on your smartphone and attempt to view your camera. If you can control and monitor your camera when not using Wi-Fi, then everything has been successfully configured. If not, something unforeseen may be complicating matters and we suggest that you contact Insteon Support for troubleshooting.


AirPort Utility (6.x)

  1. Click on your AirPort Express or AirPort Extreme.
  2. Click on the Edit button on the popup that appears.
  3. At the top of the panel that drops down, click the Network button.
  4. Click the small “+” button beneath the DHCP Reservation section.
  5. Fill out the fields for your Wi-Fi Camera. You will need to pick an IP Address that is not already in use. We suggest something like 10.0.1.222. Make note of this address as you will need it later. You can find your Wi-Fi Camera's MAC Address on the bottom of the camera.
    • Description: Insteon Wi-Fi Camera
      • If you have more than one Wi-Fi camera, use a name that is unique and descriptive of it's location in your home.
    • Reserve Address: MAC Address
    • MAC Address: 00:AA:00:AA:00:AA
    • IPv4 Address: 10.0.1.222
      • If your camera will be connected with an ethernet cable, enter the MAC Address from the larger label.
        • If your camera will be connected with Wi-Fi, enter the MAC Address from the smaller label. This label may also state "Wi-Fi MAC."
    • When finis hed, click Save.
  6. Click the small “+” button beneath the Port Settings section.
  7. Fill out the fields for your Wi-Fi Camera. The Public and Private TCP Ports should match the port displayed by your Camera. Leave the UDP Ports blank. The Private IP Address is the one that you wrote down in the previous step.
  8. When finished, click Save.
  9. At the bottom of the configuration panel, click the Update button. Your router will restart. You should also restart your camera by disconnecting and reconnecting it to power.

To test your connection, turn off Wi-Fi on your smartphone and attempt to view your camera. If you can control and monitor your camera when not using Wi-Fi, then everything has been successfully configured. If not, something unforeseen may be complicating matters and we suggest that you contact Insteon Support for troubleshooting.

Configure Manual Remote Access for Insteon Wi-Fi Cameras


When configuring Insteon Wi-Fi Cameras, you may be presented with a message stating that you need to configure port forwarding on your router to see your camera when you are away from home. There are several reasons why this may occur.


Previously Configured Insteon HD Wi-Fi Cameras

When adding an Insteon HD Wi-Fi Camera that has already been configured with a user name and password, the Insteon app does not alter any camera settings or attempt to configure Automatic Remote Access. Follow the steps in this article If you would like to enable Automatic Remote Access.


Configure Manual Remote Access with Port Forwarding

About Port Forwarding

Port forwarding is a process involving your home's router that allows you to access devices within your home when you are not using your home's Wi-Fi network.

Your home router creates a barrier that prevents your smartphone from talking directly to your Insteon Wi-Fi cameras. Port forwarding opens a door in your router's firewall for a specific function, in this case, access to your Wi-Fi cameras. This procedure needs to be performed for each Wi-Fi camera that you  intend to access from outside your home's Wi-Fi network.


Port Forwarding Instructions

Insteon Support has compiled instructions that should help you configure routers that you are likely to have in your home.

Because every router is different and manufacturers are constantly making changes, the steps outlined in these articles may not perfectly match the steps required for your particular router. If you don't see your router brand listed or if you feel uncomfortable with the instructions, contact Insteon Support for further assistance.


For step-by-step instructions, choose your router brand:

Dynamic DNS Services

In addition to configuring your camera and router for port forwarding, you will need to configure a Dynamic DNS Service to ensure reliable access to your camera when you are away from home. Learn more about Dynamic DNS Services and Insteon Wi-Fi Cameras by reading this article.


Unable to Configure Automatic Remote Access


When configuring an Insteon HD Wi-Fi Camera, you may encounter an alert stating that there was an issue configuring automatic remote access. There are several reasons why this may occur.

  • Your home's internet connection is offline

  • Your home's internet router or modem is not functioning properly

  • Your home has more than one router resulting in a Double- or Triple-NAT

  • Your home's router is incompatible with the Automatic Remote Access feature

  • In corporate or school environments, your organizations firewall and security settings may prevent Automatic Remote Access

  • Your Insteon HD Wi-Fi Camera may require a firmware update. Learn more about updating your Wi-Fi Camera's firmware.

  • Automatic Remote Access is not available on standard-definition Insteon Wi-Fi Cameras, standard-definition Insteon Outdoor Wi-Fi Cameras or Insteon HD Outdoor Wi-Fi Cameras that do not have a UID number printed on the rear of the camera housing.
 

Basic Troubleshooting

  1. Confirm that your internet router and cable or DSL modem are connected to power and turned on. Learn how to Identify your router and cable or DSL modem.

  2. Check that your internet connection is working by attempting to browse to a website using another device or computer in your home.

  3. Try restarting your router and cable or DSL modem.

  4. If your home has more than one router, connect Insteon Wi-Fi Camera to the router connected directly to your cable or DSL modem. If your Internet Service Provider has issued you a combined modem and router, connect Insteon Wi-Fi Camera to this device and attempt setup again.

  5. If you believe that your router is preventing Automatic Remote Access, you can try updating your router's firmware. Follow the instructions provided by your router manufacture.

  6. If you are attempting to setup an Insteon Wi-Fi Camera in a corporate or school setting, your IT department may have blocked the ports necessary for Automatic Remote Access to function. Contact your system administrator if you believe this to be the case.

If you are unable to alter your networking environment to enable Automatic Remote Access, you can still configure manual remote access using port forwarding.


Configuring Automatic Remote Access After Initial Camera Setup

You can enable Automatic Remote Access after adding your Insteon Wi-Fi Camera from camera settings.

Instructions for iPhone, iPad or iPod touch
Instructions for Android

iPhone, iPad and iPod touch

Step 1

Navigate to Settings

step-1.png

Step 2

Tap Devices

step-2.png

Step 3

Select your HD Wi-Fi Camera from the list of devices

step-3.png

Step 4

Scroll to the bottom of the camera settings and tap the switch to enable Automatic Remote Access.

Your camera will attempt to configure Automatic Remote Access. If your camera is unable to configure Automatic Remote Access, you will have to configure remote access manually using port forwarding on your router.

step-4.png
 

Android

Step 1

Navigate to Settings by tapping the Settings button and then selecting Edit Settings

android-step-1.png

Step 2

Tap Devices

android-step-2.png

Step 3

Select your HD Wi-Fi Camera from the list of devices

android-step-3.png

Step 4

Scroll to the bottom of the camera settings and tap the switch to enable Automatic Remote Access.

Your camera will attempt to configure Automatic Remote Access. If your camera is unable to configure Automatic Remote Access, you will have to configure remote access manually using port forwarding on your router.


2-Wire (AT&T/SBC) Router - Port Forwarding Guide

Note: 2-Wire routers are usually distributed by ATT/SBC in North America

Step 1: Open your web browser and enter router’s IP address (192.168.1.254 by default) in the address bar. Enter username and then password to login.

Step 2: Find and click on the Firewall tab on the top right.

Step 3: Find and click on the Firewall tab on the top right. Once the page is loaded, click on Add a new user-defined application.


Step 4: For ‘Application Name’ give this entry a name e.g. INSTEON Camera
For ‘Protocol’ Choose ‘TCP’
For ‘Port (or Range)’ in ‘From’ & ‘To’ enter the ports to be forwarded.
Example: 8090 to 8090
For ‘Protocol Timeout (seconds)’ & ‘Map to Host Port’ & ‘Application Type’ you can leave these all at their default values.
Click ‘Add Definition’
Repeat this step for all ports.
Once you have entered all the ports for this entry click ‘Back’

Step 5: For ‘Select a computer’ choose the INSTEON Camera’sIP address to forward the ports to.
Choose ‘Allow individual applications’
Choose ‘User-defined’ from the drop down box
In the list on the left choose the entry you created “INSTEON Camera” and then click ‘Add’
Repeat this step for each entry you need to add.
Once you are all done click ‘Done’


Step 6: Once you’ve done that, INSTEON Camera should appear in the Hosted Applications
Click the Done button at the bottom right corner of the screen, and you should see the following screen:

Step 7: To view the camera over the internet enter you router external IP address which can be found by typing www.whatismyipaddress.com into your browser.

Enter your IP address (eg. 24.76.212.746): port for the camera (e.g. port 8090).
24.76.212.746:8090 is what should be typed into you browser.

You can check port is forwarded successful or not on
http://www.yougetsignal.com/tools/open-ports/


Verizon/Actiontec Router/Modem - Port Forwarding Guide

Actiontec GT704WG & GT704WGB gateways

Step 1: Open your web browser and enter router’s IP address (192.168.0.1 by default) in the address bar. Enter username (“admin” by default) and then password (“password” by default).

Step 2: Navigate to Security > Applications. Select the camera on your network where you want to use port forwarding in the PC Name field. Select User in the Category list and click New.

Step 3: Enter a name for your port forwarding rule in the Rule Name field. 
Select TCP in protocol and enter camera’s port number in port start, port end and port map start. Click Apply to save your rule settings.

Click Back to return to the Applications screen.

Step 4: Select the name of the rule you just created in the Available Rules box and click Add to use this port forwarding rule on camera. Click Apply.

You can check port is forwarded successful or not on
http://www.yougetsignal.com/tools/open-ports/


D-Link Router - Port Forwarding Guide

Step 1: Open your web browser and enter router’s IP address (192.168.0.1 by default) in the address bar. Enter username ("admin" by default) and then password (blank by default).

Step 2: Navigate to Advanced > Virtual Server
Enter the following information:
Check the box next to Enable.
Enter camera’s port in Service Ports. (Eg: 8090) 
Enter camera’s IP address in Service IP. (Eg: 192.168.0.190) 
Click Always in schedule.
Click Apply and then click Restart to save your changes.


You can check port is forwarded successful or not on
http://www.yougetsignal.com/tools/open-ports/


Belkin Router - Port Forwarding Guide

Step 1: Open your web browser and enter router’s IP address (192.168.0.1 by default) in the address bar. Enter username your router password (the default password is blank).

Step 2: Navigate to Firewall > Virtual Servers


Step 3: Check Enable
In the Description column enter a description of your network device (e.g. INSTEON Camera 1)
In “Inbound port” enter camera’s port number.
Next choose the “Type” you want to use. (For INSTEON cameras we will use TCP or Both)
Enter the Camera’s IP address in “Private IP Address”
In “Private port” enter camera’s port number.
Repeat step 5 for any more ports you want to forward.
Click on “Apply Changes”

You can check port is forwarded successful or not on
http://www.yougetsignal.com/tools/open-ports/


Port Forwarding Guides

The port forwarding set up is reliant upon the specific brand and model number of the router being used. The Insteon Hub (2012) and Insteon WiFi Cameras require forwarding for access to your network device from outside of your home network. The new Insteon Hub (2014) does not require port forwarding. Regardless of the router being used, the process of port forwarding is similar. Below is a list of port forwarding guides for popular routers:

Please follow the link below if your router is not listed.

Port Forwarding Guides