Open/Close Micro Module - Guía Rápida de Instalación y Uso

On/Off Micro Module - Guía Rápida de Instalación y Uso

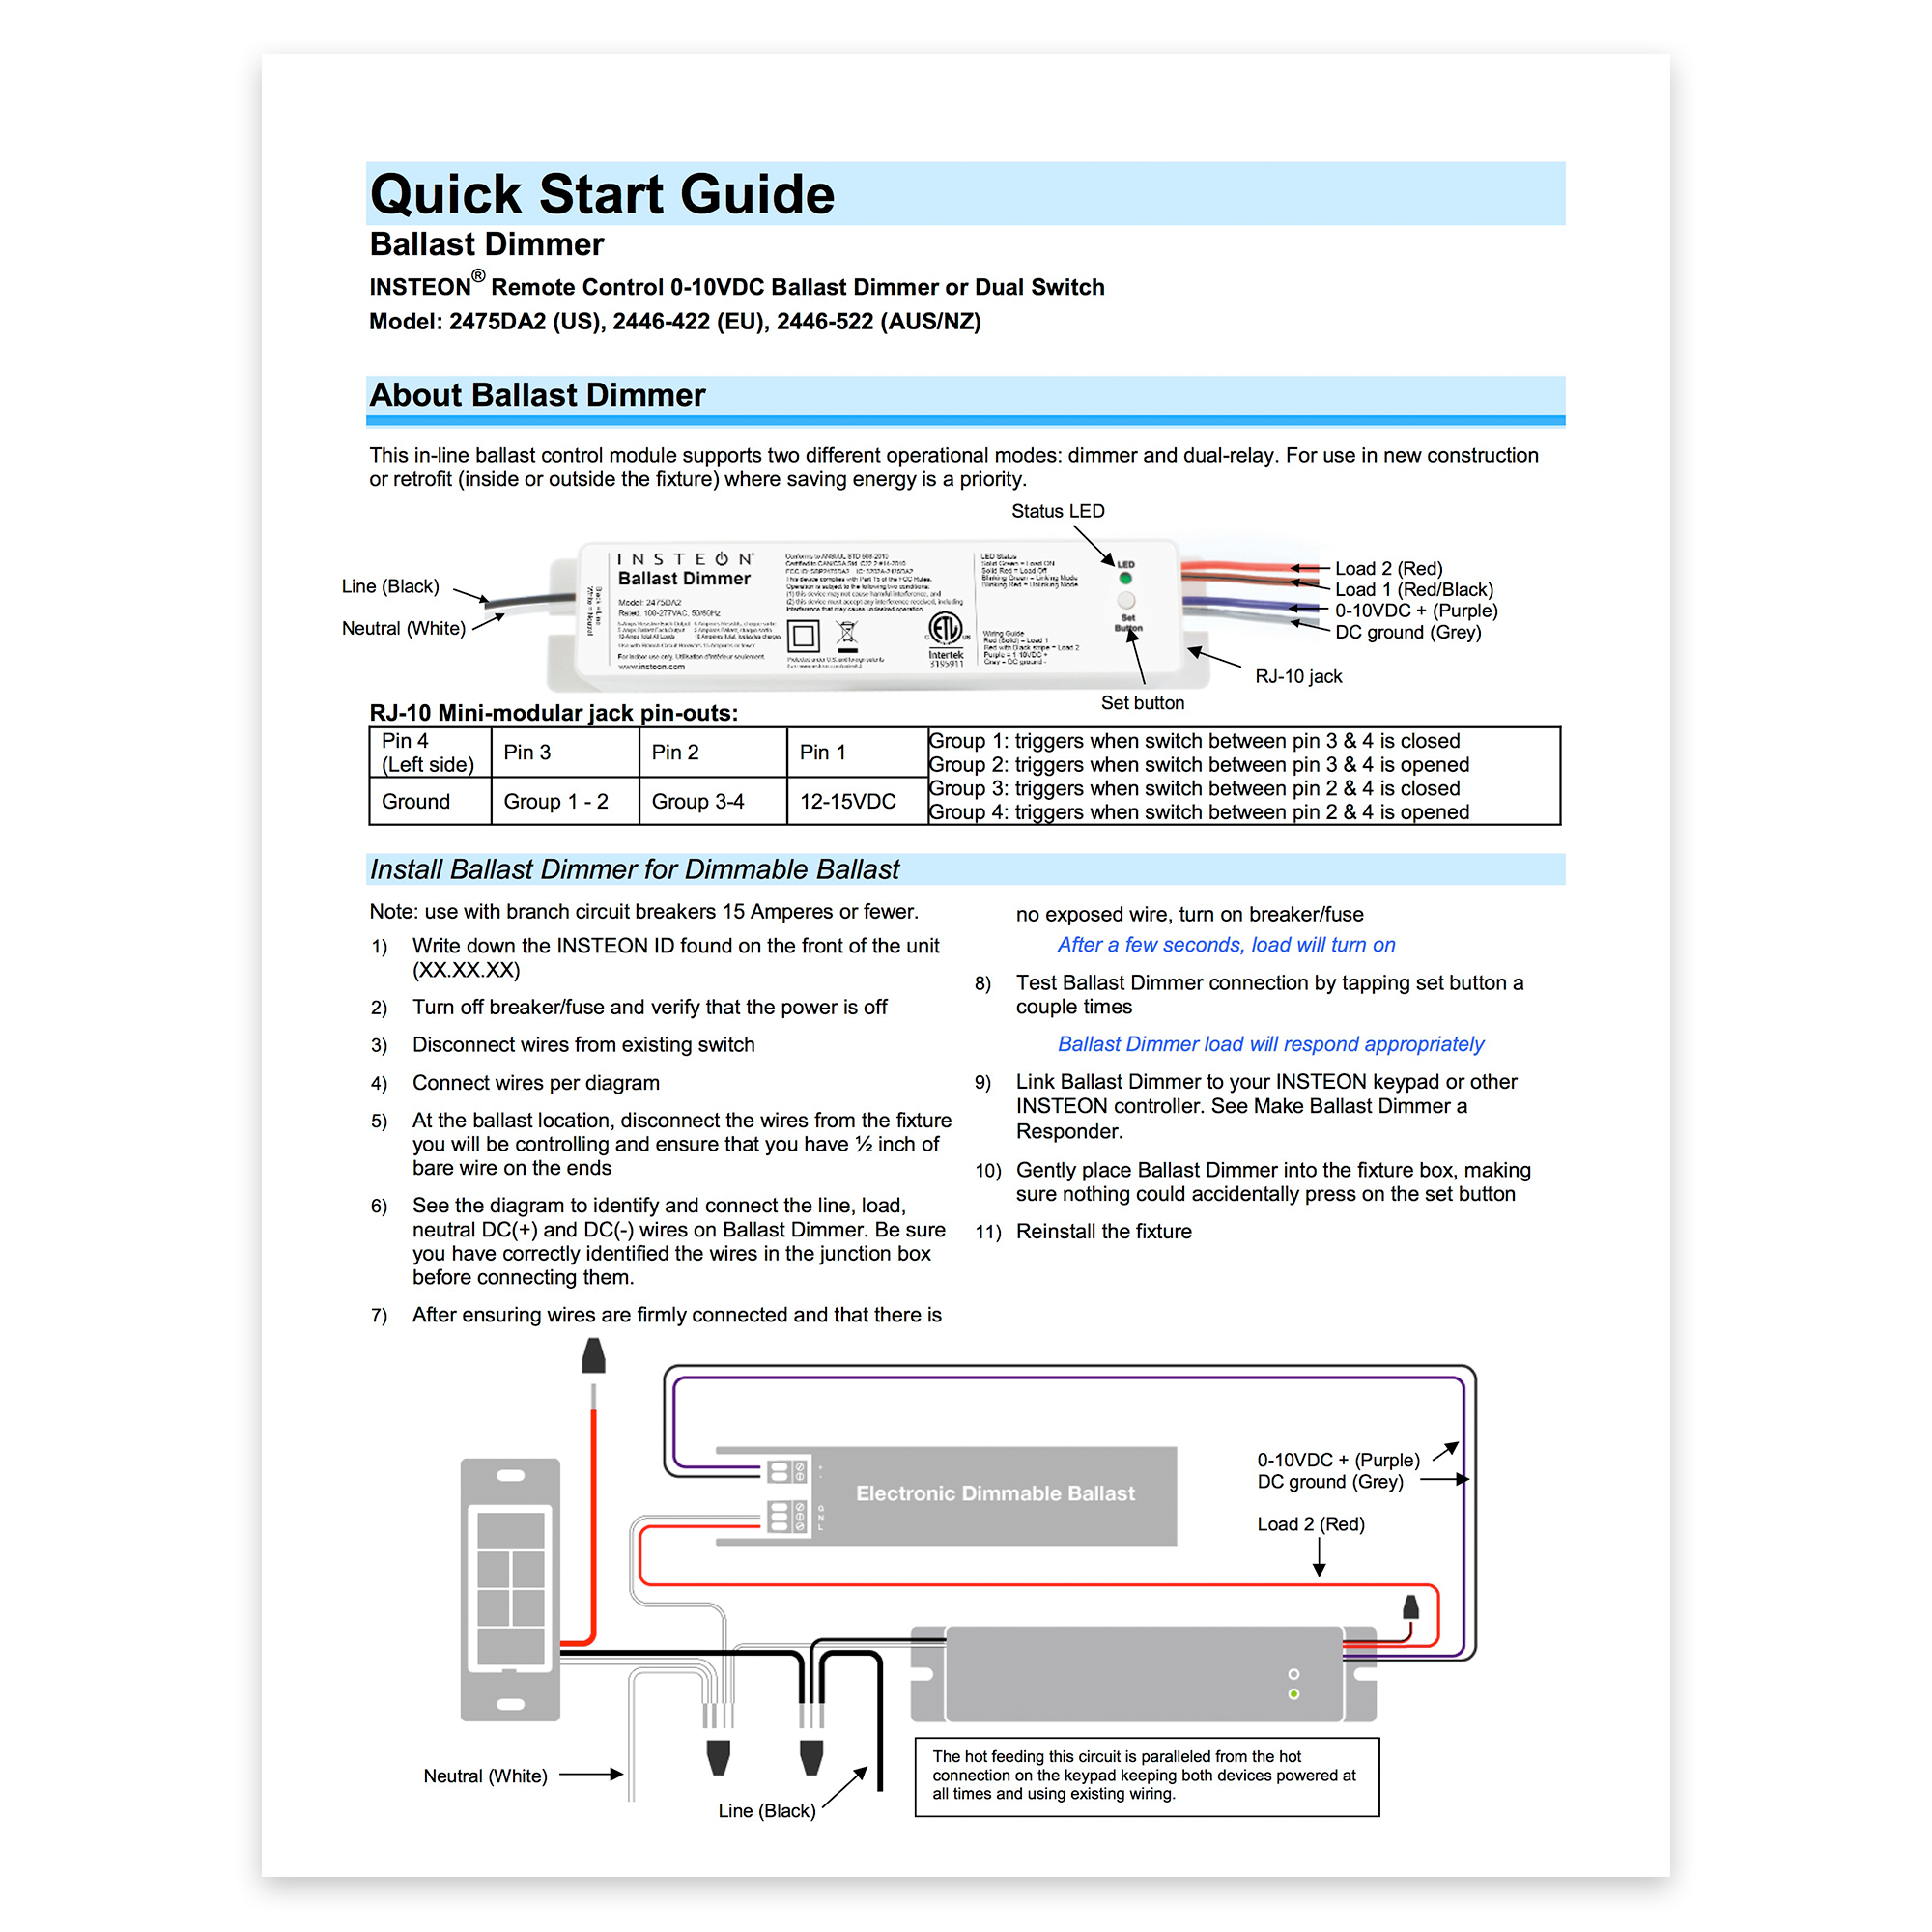
Dimmer Micro Module - Guía Rápida de Instalación y Uso

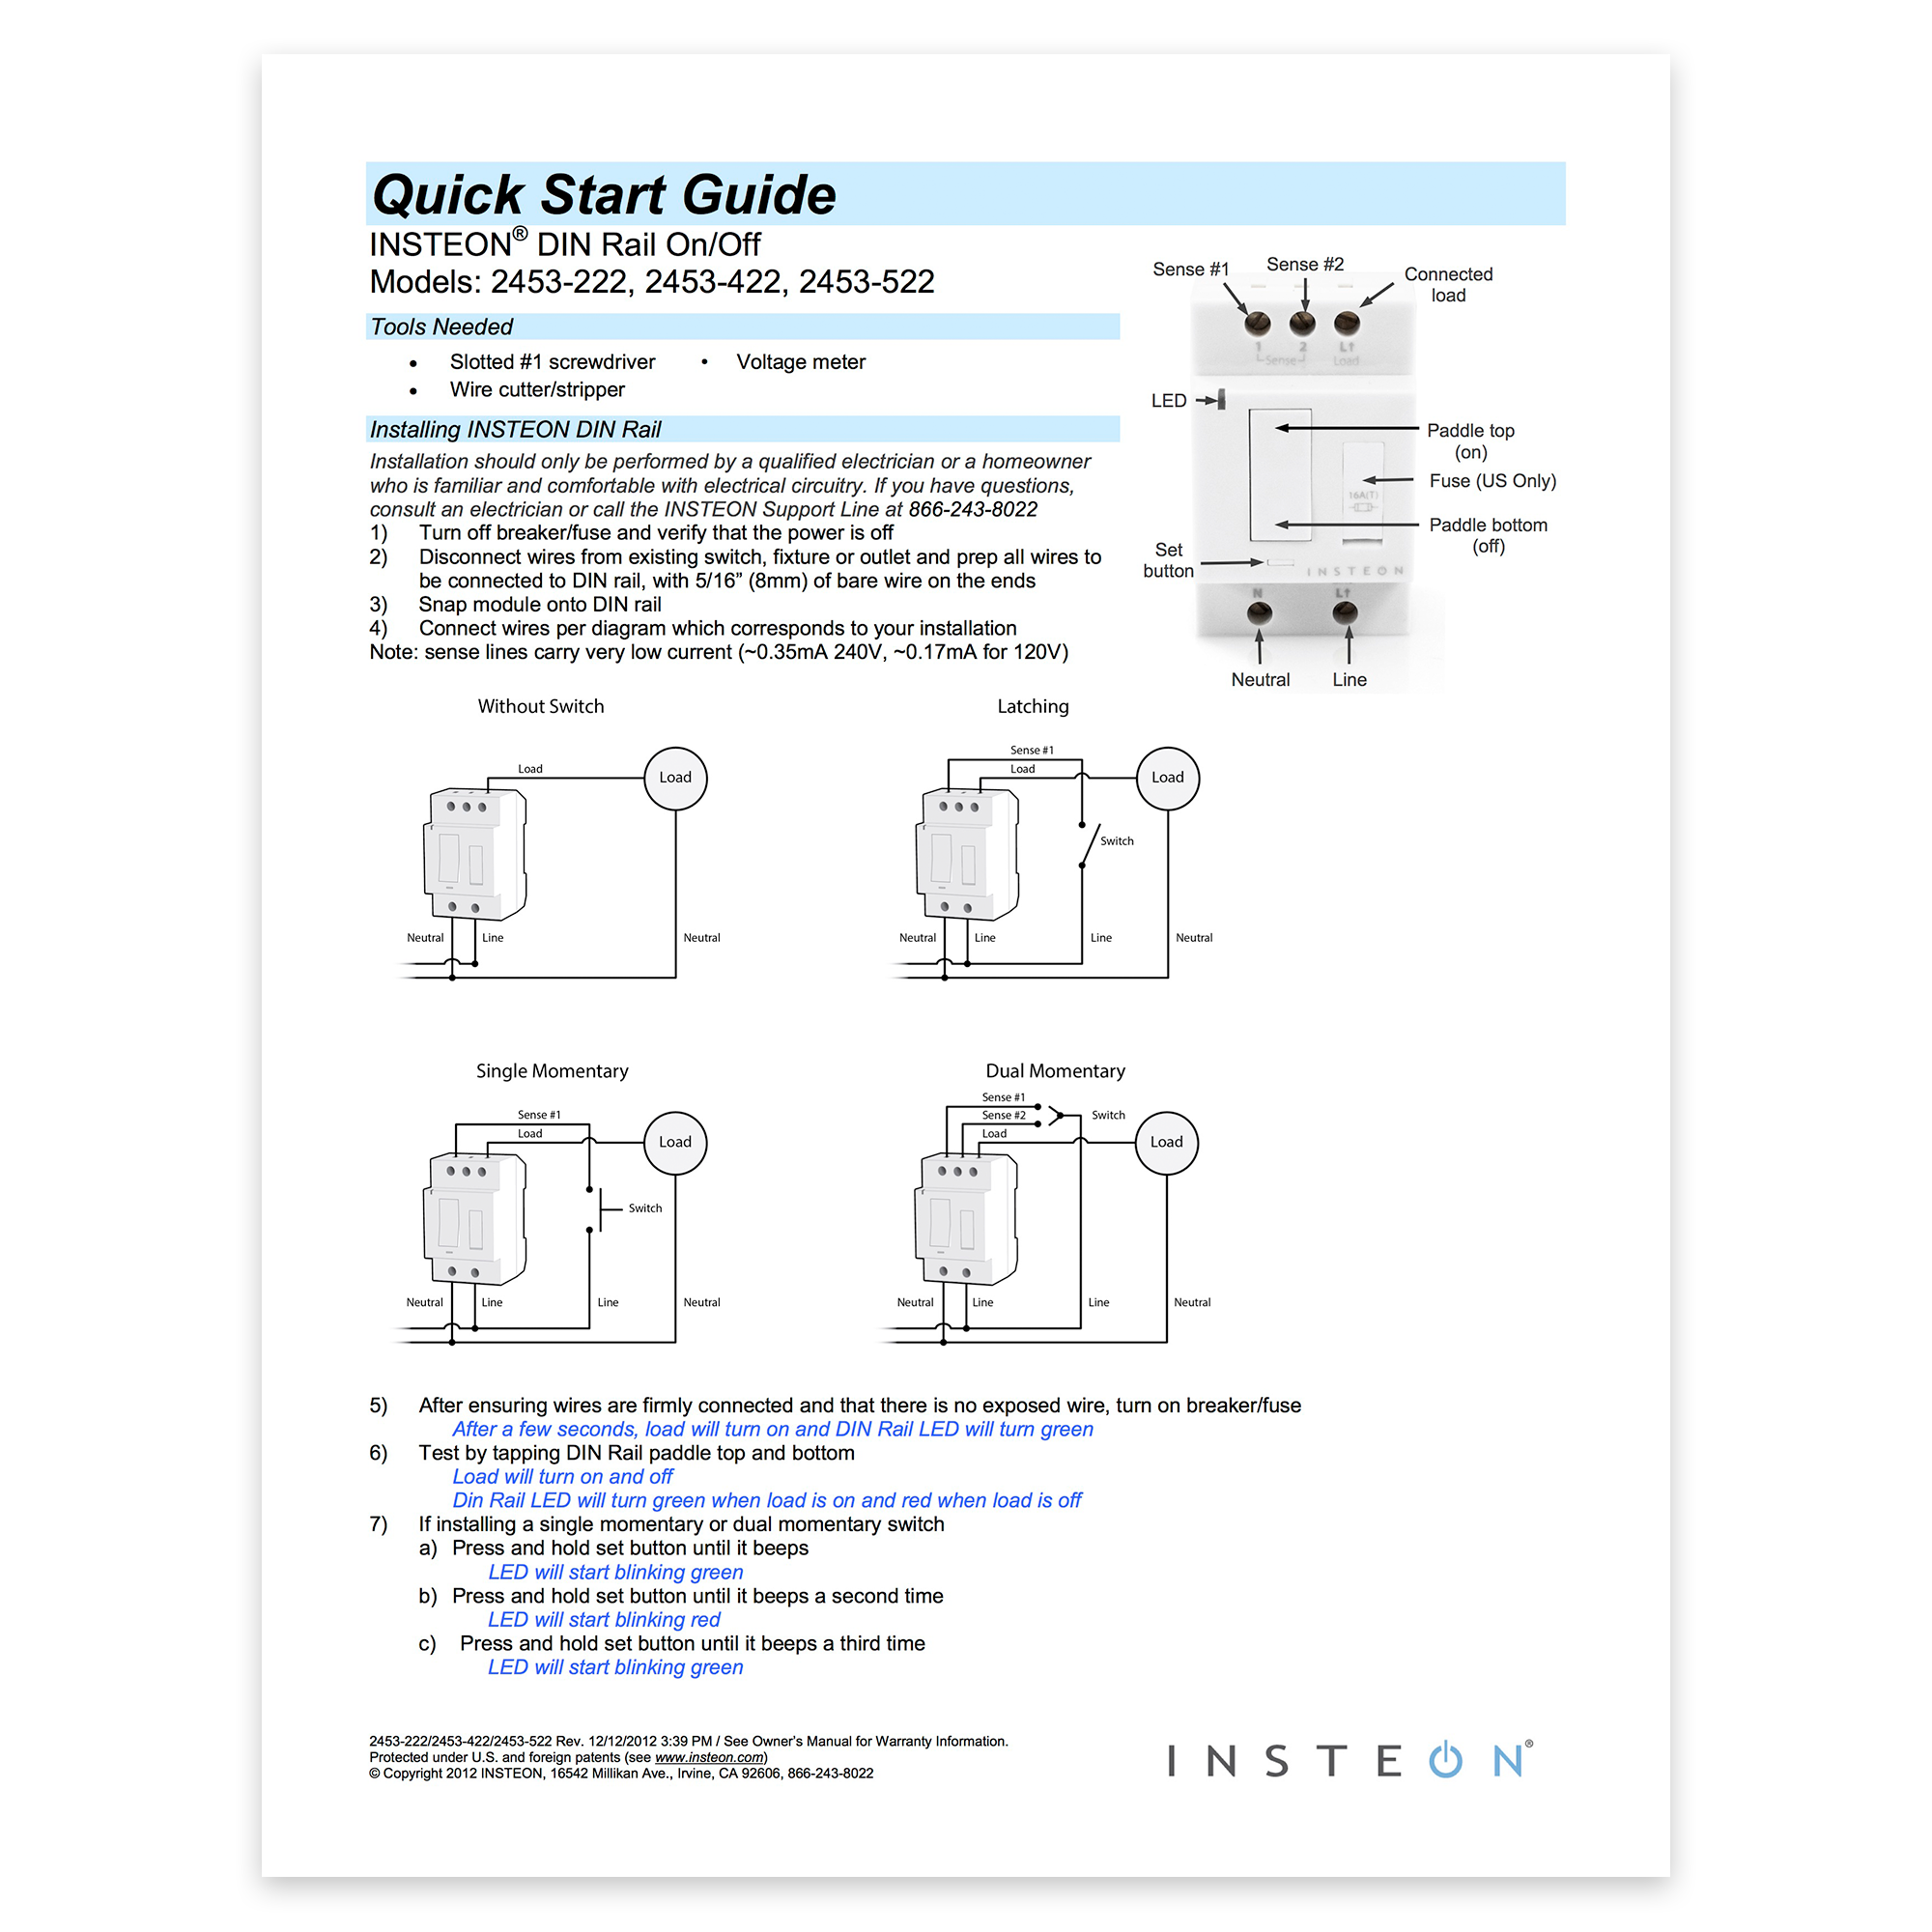
On/Off DIN Rail Module - Quick Start Guide
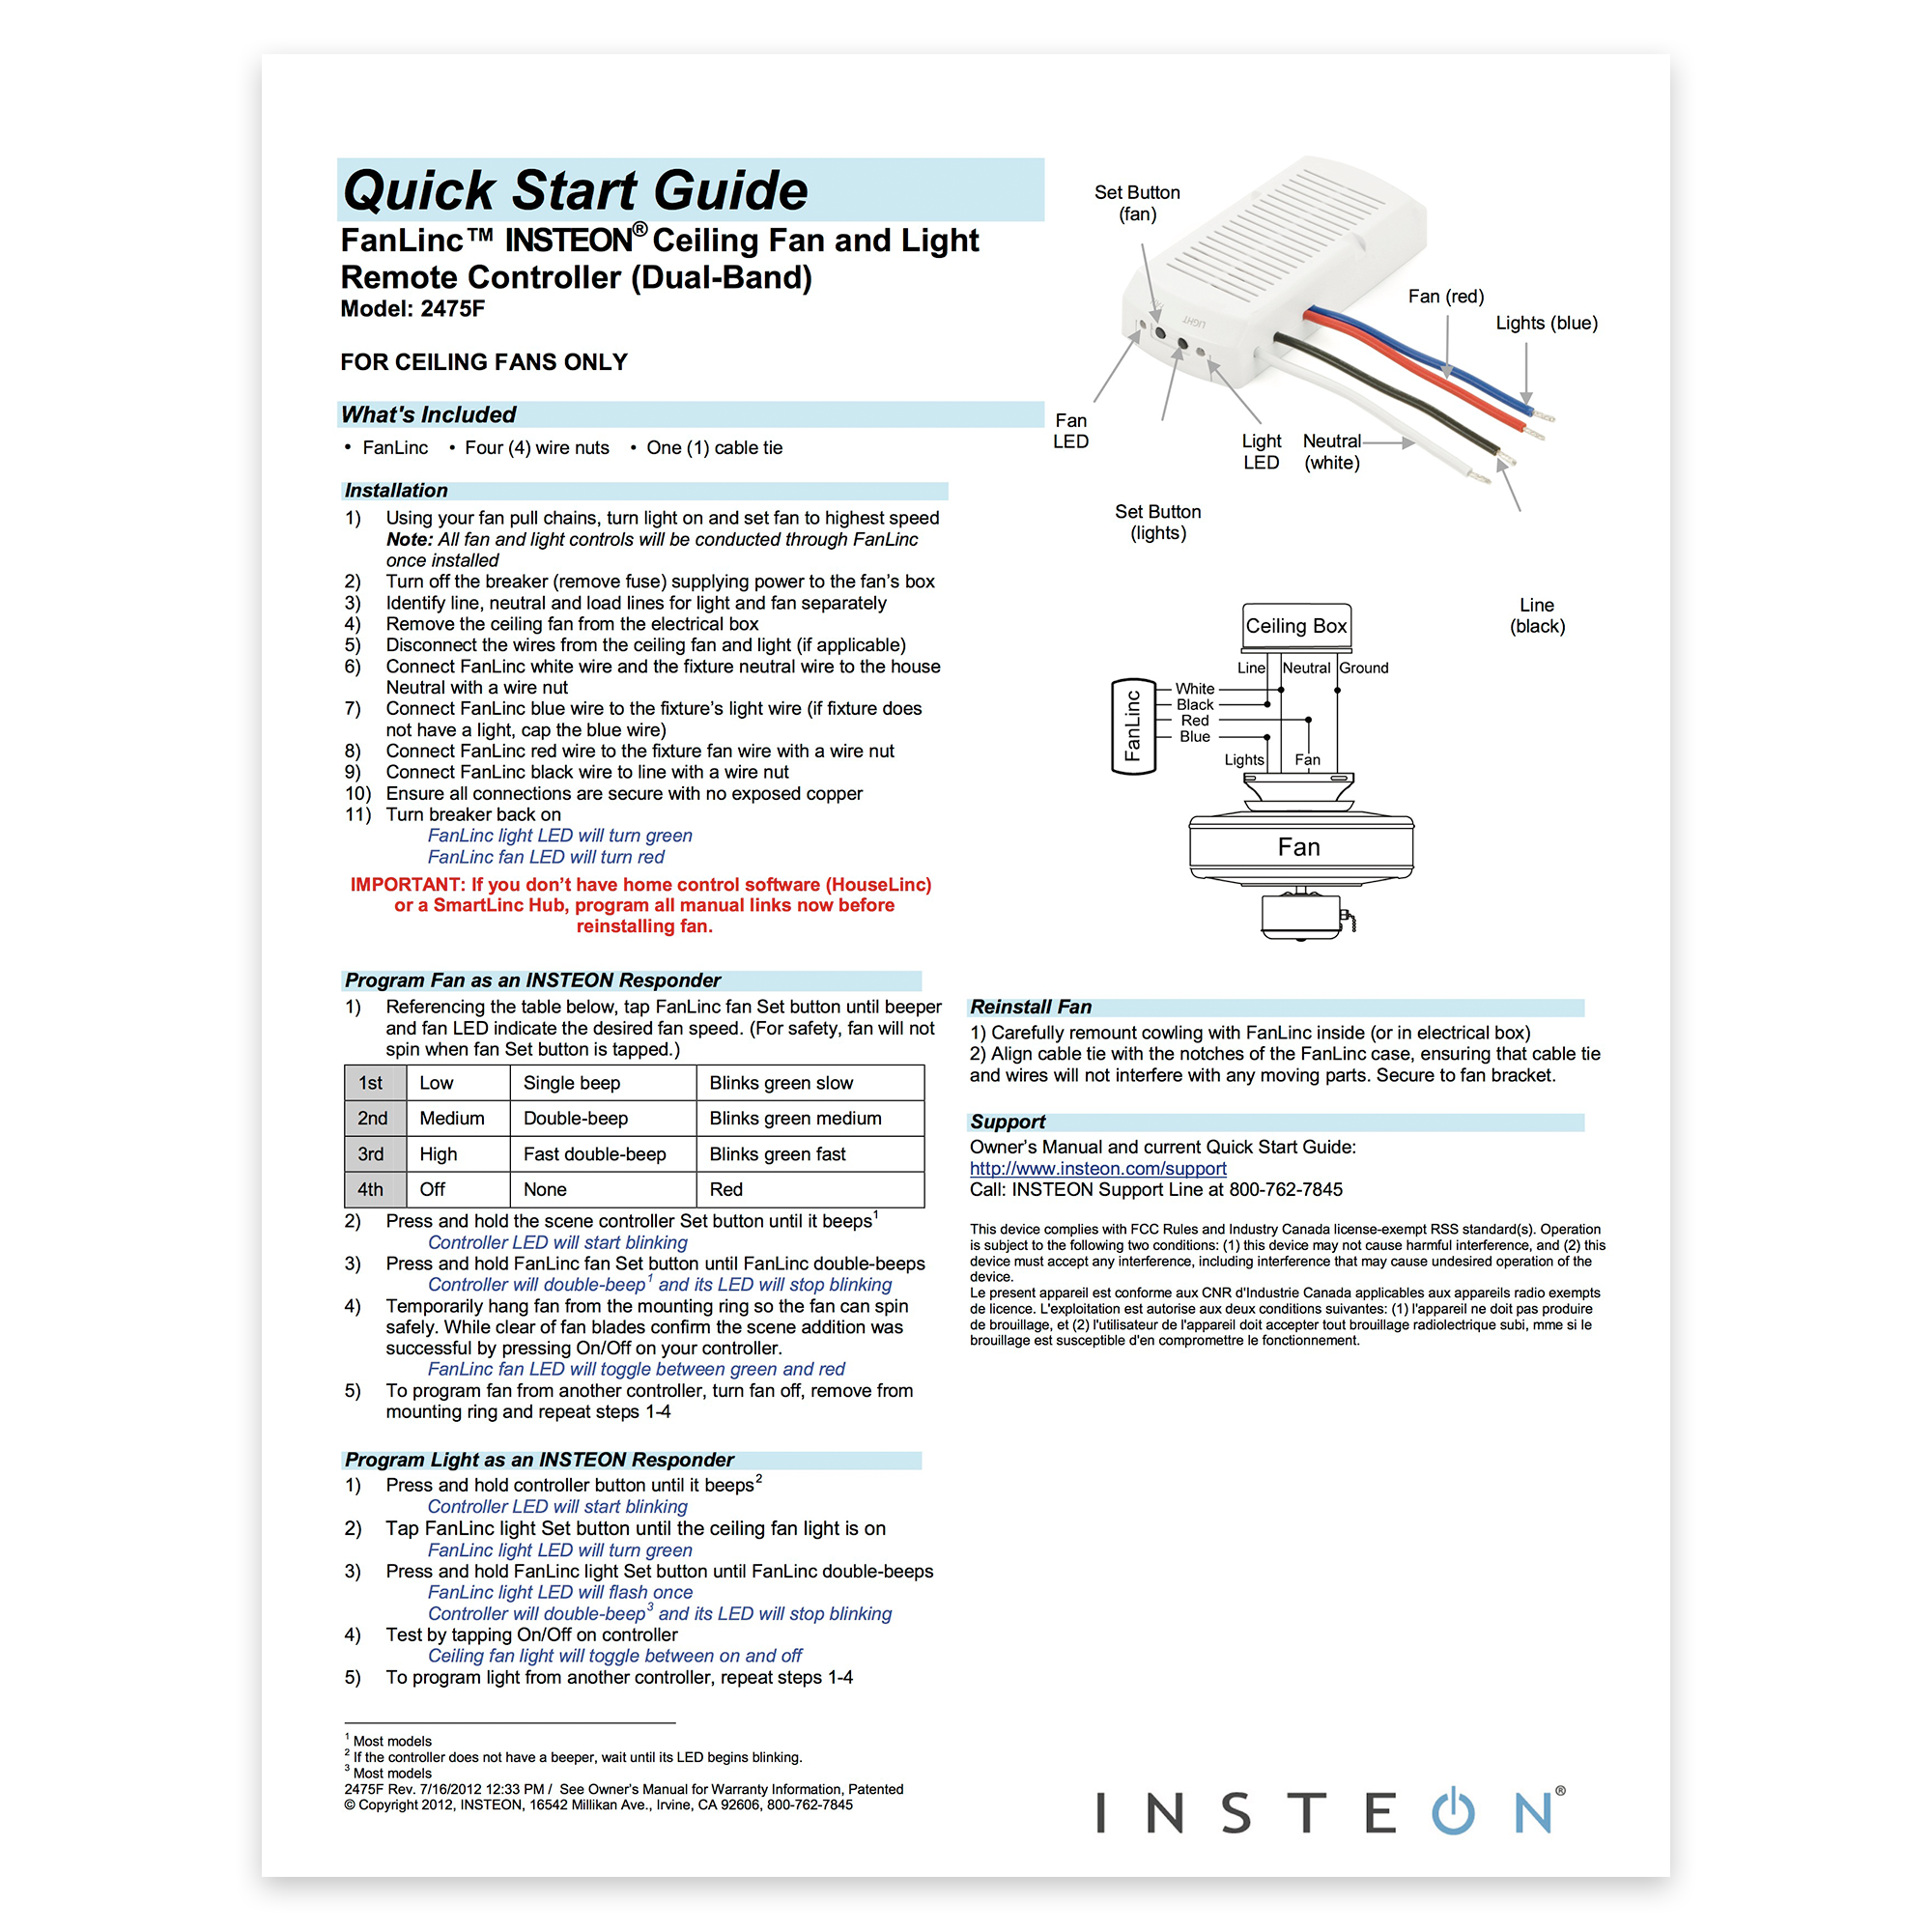
Ceiling Fan Controller - Quick Start Guide
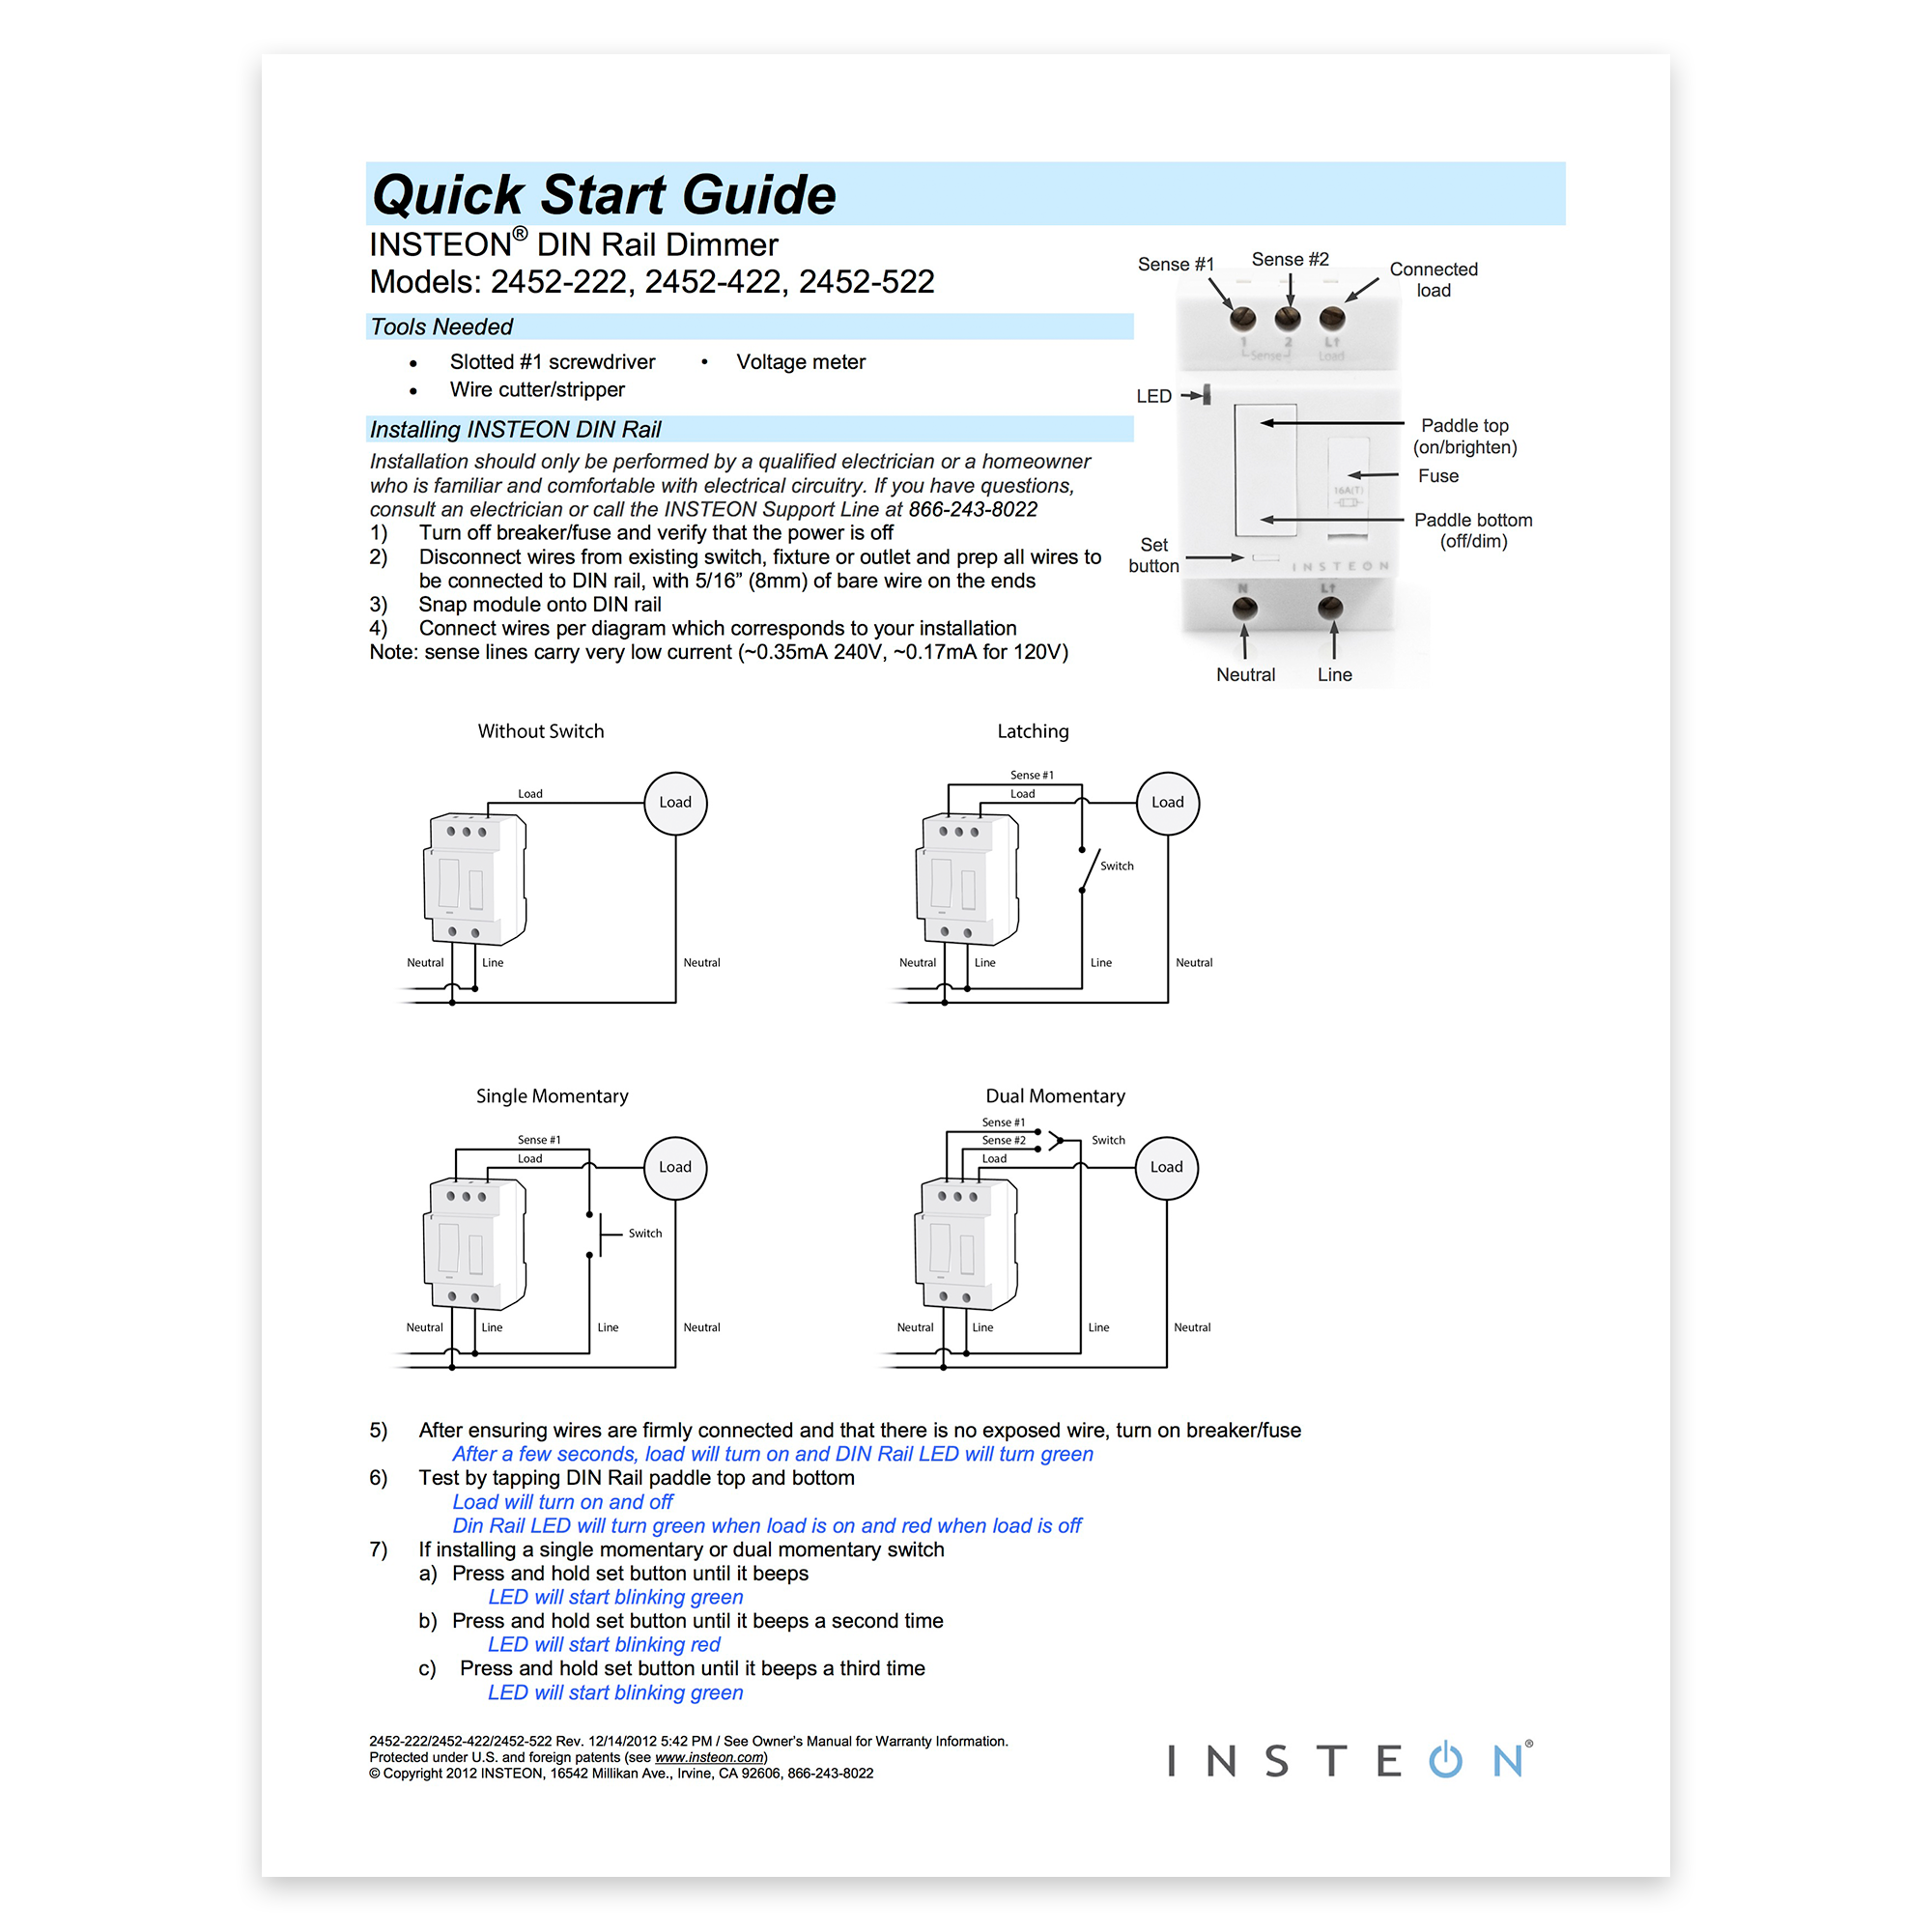
Dimmer DIN Rail Module - Quick Start Guide
I/O Module - Quick Start Guide

Wireless Thermostat - Quick Start Guide
Thermostat Adapter - Quick Start Guide

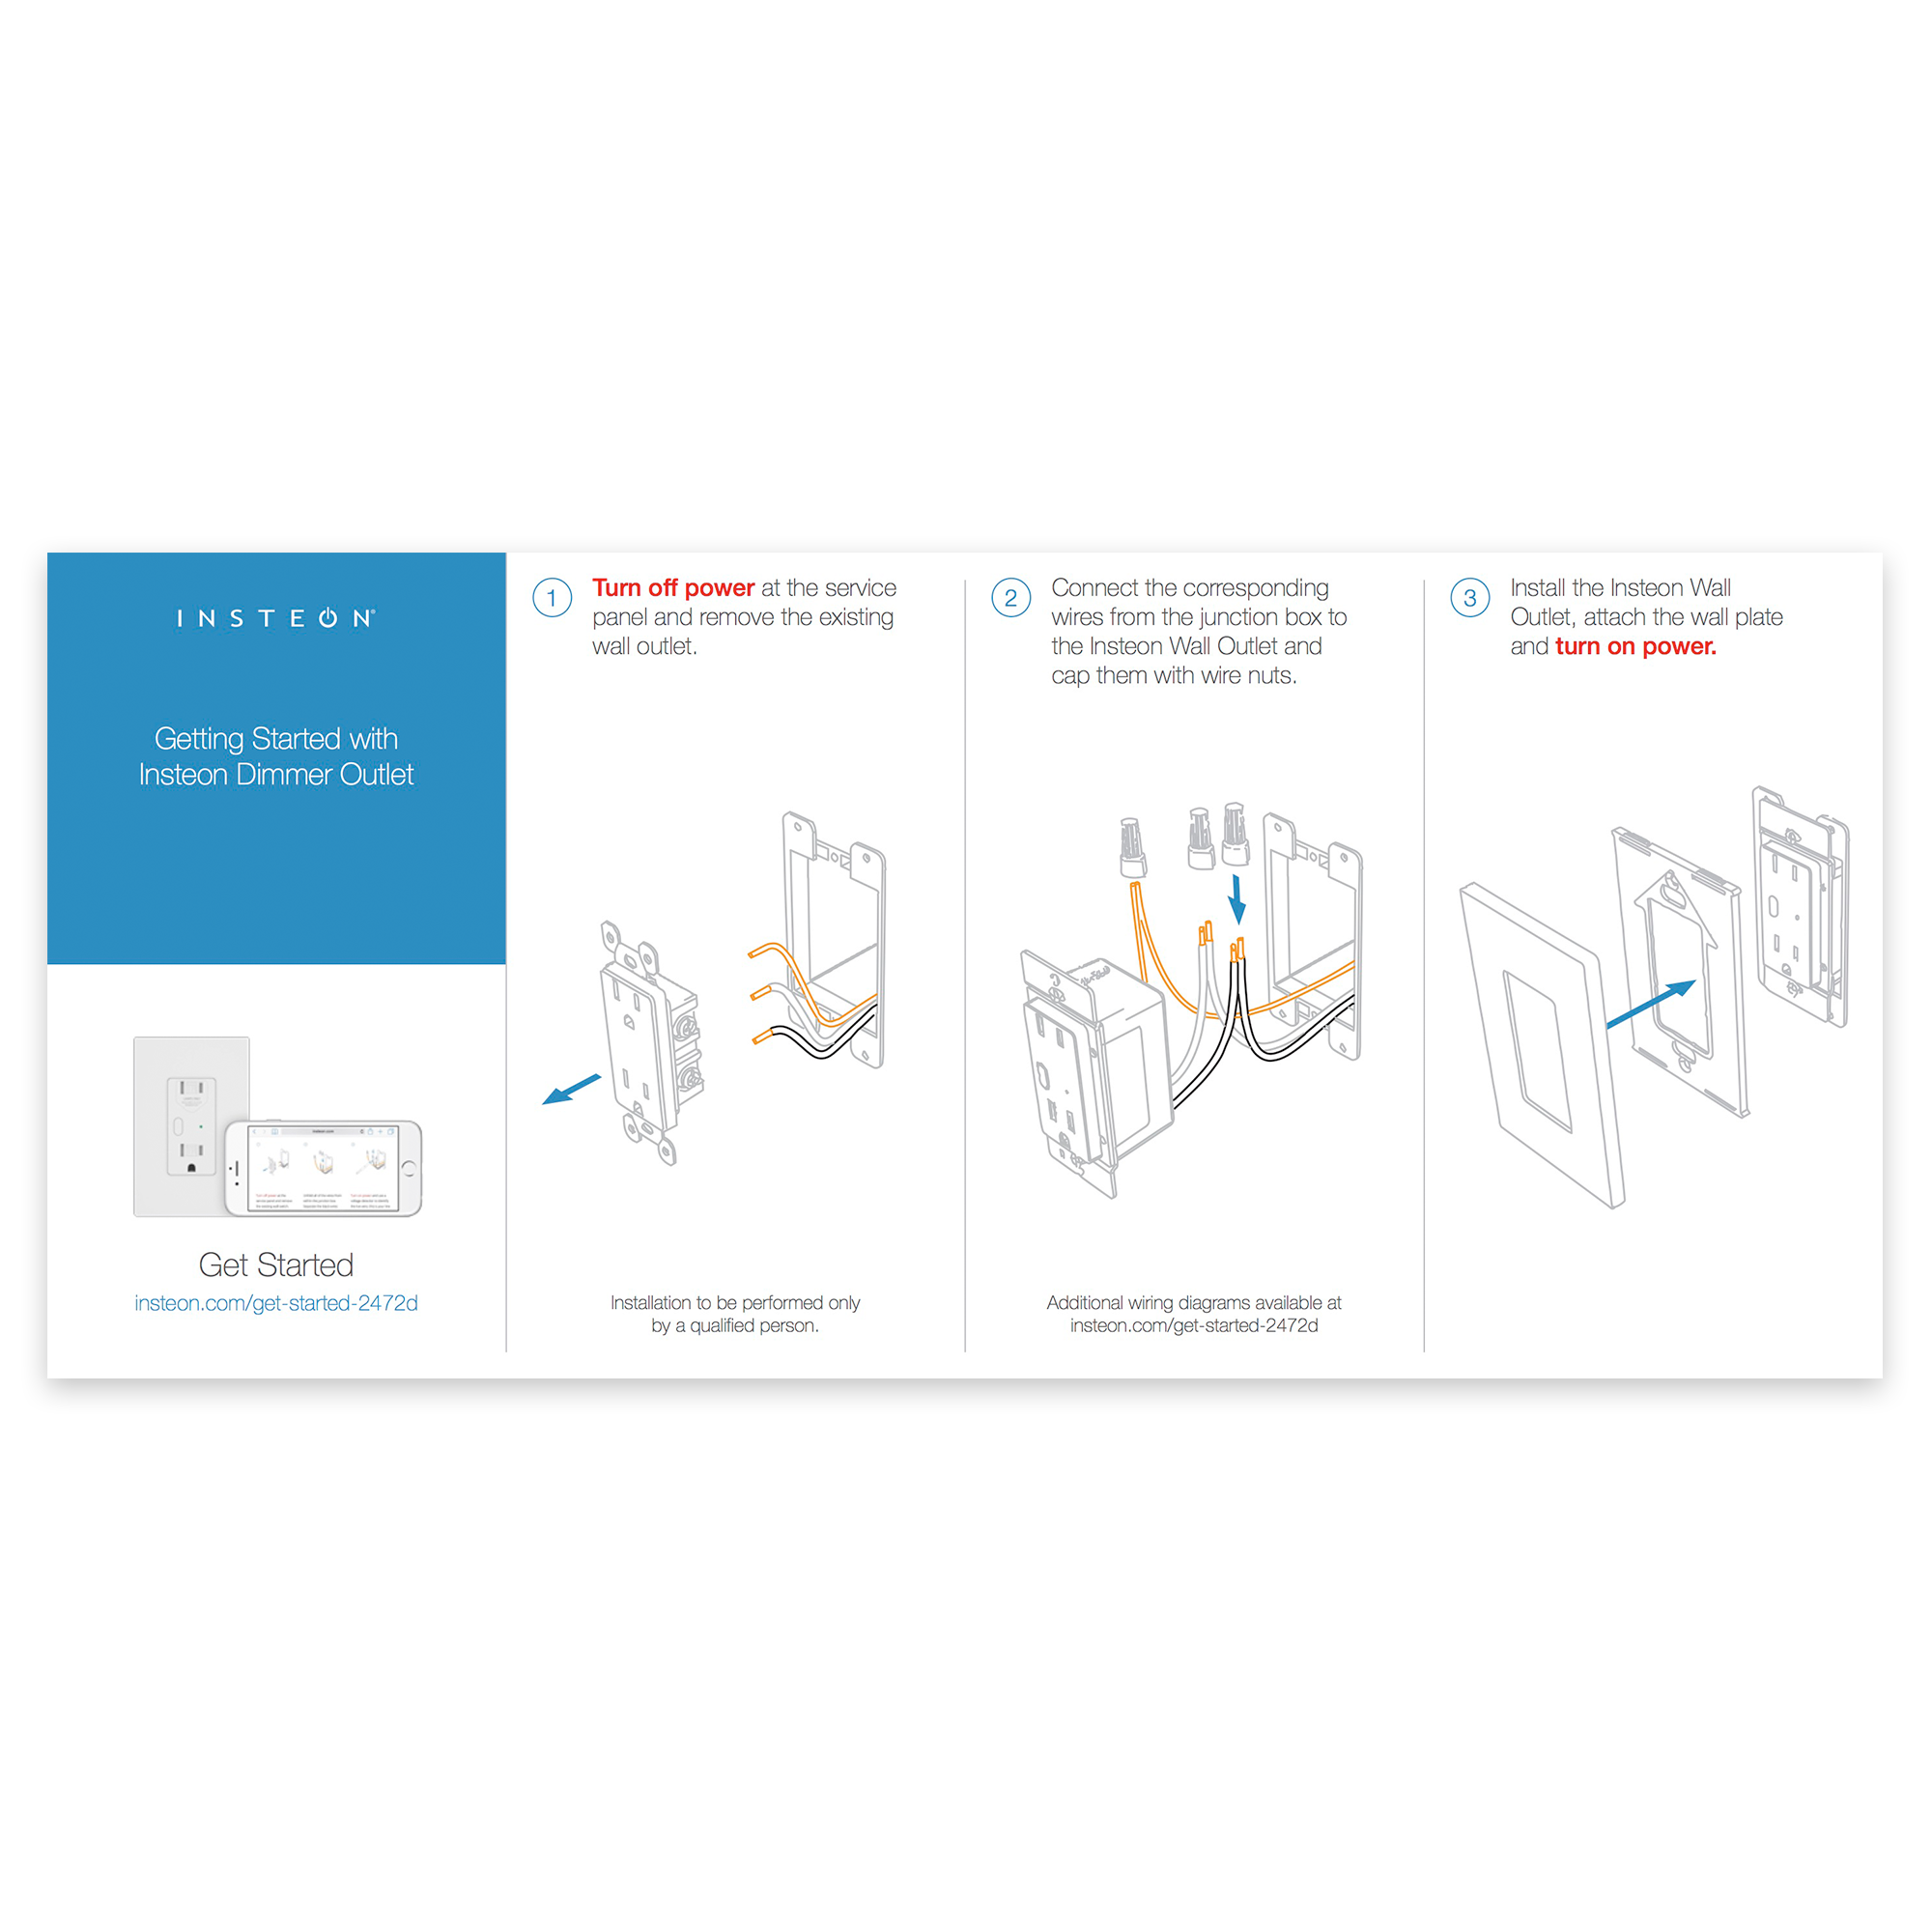
Dimmer Outlet - Quick Start Guide
Mini Remote (4-Scene) - Quick Start Guide

LED Bulb for Recessed Lights - Quick Start Guide

LED Bulb for Recessed Lights - Owner Manual
On/Off DIN Rail Module - Guía Rápida de Instalación y Uso

Identifying Your Device Revision
As we continually improve our products by adding new features, some instructions may vary depending onthe particular revision of your product. See below for instructions on locating the revision of your product.
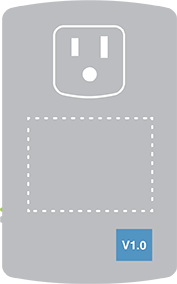
Non-Wired-In Devices
1. Look at the back of the unit (unplug the unit from the wall if it is a plug-in product)
2. Locate the sticker (on the label side) which contains the letter "V" followed by a number like "1.0"

In-Wall Switches, Keypads & Outlets
1. If the product is already installed, remove the trim plate
2. Locate the sticker (on the aluminum bracket) which contains the letter "V" followed by a number like "1.0"


DIN Rail Modules
1. Locate the sticker on the left side of the module which contains the letter "V" followed by a number like "1.0"
2. If ganged together, you may need to remove the DIN Rail module from its mounting rail

Mini Remotes
1. Locate the sticker on the back of the remote which contains the letter "V" followed by a number like "1.0"

Wireless Sensors
1. On Open/Close sensors, remove the top housing. For Motion sensors, remove the back access panel and the battery.
2. Locate the sticker which contains the letter "V" followed by a number like "1.0"


Insteon Retail Device Numbers
Insteon products purchased through some third party retailers may refer to devices by a "Device Number." The Device Number does not affect an Insteon device's interoperability with Insteon products that have not been issued a device number.
| Device Number | Device Name |
|---|---|
| 10 | Dimmer Module |
| 11 | On/Off Module |
| 12 | Dimmer Switch |
| 14 | On/Off Switch |
| 15 | On/Off Outlet |
| 16 | Dimmer Switch (2-Wire) |
| 17 | Range Extender |
| 20 | Dimmer Keypad (6-Button) |
| 23 | LED Bulb |
| 24 | LED Bulb for Recessed Lights |
| 30 | Mini Remote (4-Scene Kit) |
| 32 | Motion Sensor |
| 33 | Leak Sensor |
| 36 | Smoke Bridge Kit |
| 40 | Open/Close Sensor |
| 41 | Hidden Door Sensor |
| 42 | Wired Thermostat |
| 43 | Garage Door Kit |
| 44 | IO Module |
| 45 | WiFi Camera (Black) |
| 46 | WiFi Camera (White) |
| 47 | Outdoor WiFi Camera |
| 50 | Ceiling Fan Controller |
| 51 | Dimmer Micro Module |
| 52 | On/Off Micro Module |
| 53 | Open/Close Micro Module |
| 55 | HD WiFi Camera (Black) |
| 56 | HD WiFi Camera (White) |
| 57 | Outdoor HD WiFi Camera |
Update your SD WiFi Camera Firmware
Follow the instructions in this article to update the Device Firmware and Web UI Firmware on your Insteon SD WiFi Camera. The steps in this article apply to Insteon SD WiFi Camera and Insteon SD Outdoor WiFi Camera. For instructions on how to update your HD WiFi Camera firmware, see Update your HD WiFi Camera System Firmware.
Identify your WiFi Camera Firmware Version
Follow the instructions in Identify your WiFi Camera Firmware Version to determine if your WiFi Camera requires updating.
Update your SD WiFi Camera System Firmware
1. Download the most current firmware for your Insteon SD WiFi Camera or Insteon SD Outdoor WiFi Camera
2. Open the IP Camera Tool and wait for it to identify the Insteon WiFi Camera that you wish to update
Featured

3. When the desired Camera appears, double-click to select it in the list. This should launch your computer’s default web browser and take you to a login page for the Camera.
4. Enter your Camera’s user name and password. If you never changed the user name or password, the default name is “admin” and the default password is blank.
5. Click Login or OK
6. Click the button that corresponds to the web browser you are using to update your WiFi Camera firmware
7. Click Device Management in the lower left corner
8. In the left sidebar, click Backup & Restore Settings
9. In the Backup row, click Submit. A file will download to your computer named params.bin. This file contains all of the settings and configuration for your camera and will be used to restore your preferences after the firmware update.
10. In the left sidebar, click Upgrade Device Firmware
11. In the Upgrade Device Firmware Row, click the Choose File button and select the firmware downloaded from insteon.com at the beginning of these instructions
12. In the Upgrade Device Firmware Row, click the Submit button. The upgrade process will take about 1 minute during which time your camera will restart. Do not unplug your camera or refresh your browser during this time. When the upgrade is complete, your browser will refresh automatically.
13. When the Firmware Upgrade completes, your web browser will refresh to Device Status. Confirm that the version displayed in the Device Firmware Version row matches the updated device firmware
Update your SD WiFi Camera Embedded Web UI
The web user interface is updated separately from the camera device firmware but the steps are identical.
1. In the left sidebar, click Upgrade Device Firmware
2. In the Upgrade Device Embedded Web UI row, click the Choose File button and select the Device Web UI file downloaded from insteon.com at the beginning of these instructions
3. In the Upgrade Device Embedded Web UI row, click the Submit button. The upgrade process will take about 3 minutes during which time your camera will restart. Do not unplug your camera or refresh your browser during this time. When the upgrade is complete, your browser will refresh automatically.
4. When the Device Embedded Web UI upgrade completes, your web browser will refresh to Device Status. Confirm that the version displayed in the Device Embedded Web UI row matches the updated Device Embedded Web UI
Restore your SD WiFi Camera Preferences
1. In the left sidebar, click Backup & Restore Settings
2. Click the Choose File button and select the params.bin file that was downloaded to your computer previously
3. Click the Submit button. The restore process will take about 1 minute during which time your camera will restart. Do not unplug your camera or refresh your browser during this time. When the restore is complete, your browser will refresh automatically.
Unusual Camera Behavior with iOS App version 1.9.0
If you are experiencing issues with your existing cameras after updating to iOS app version 1.9.0, please look at your camera's log-in information. If the username or password contains multiple words separated by spaces then the app is known to have issues pulling this information properly into the system.
Please delete the existing camera from the app and then log into the camera at it's local IP address through the WiFi Camera Tool
Once you have logged into the camera and selected your browser, navigate to Device Settings > User Settings and change the username and password so that it confirms to the following.
- No more than 10 characters.
- No spaces.
No "invalid" characters including: ! @ # $ % ^ & * ( ) - +
Once this has been completed and the camera has finished rebooting, add the camera back into your hub through the app and the issue should be corrected.
Download the WiFi Camera Tool
"Invalid Params" Error Message
Symptoms
The Insteon Camera is generating the following error anytime you attempt to save any changes:
invalid params
Causes
The error is cause by invalid characters in the Username or Password of the camera
! @ # $ % ^ & * ( ) - +
Resolution
The only way to resolve this issue is to factory reset the camera. You are not able to change the username or password in the camera, as the existing login information is invalid.
To perform a factory reset, locate the hole in the bottom of the camera marked RESET, and use a paperclip or similar object to press an hold the RESET button for 15 seconds. If performed correctly, the camera will start to pan and tilt within 30 seconds of the reset.